
How to measure Average Time to Purchase in GA4 & GTM
Why Measure Time to Purchase?
Google Analytics 4 (GA4) doesn’t offer a built-in way to see how long it takes a user to convert. For marketers and analysts, this is valuable context - especially when you're optimising journeys, testing campaigns, or building audience segments.
In this guide, I’ll walk you through how to capture "average time to purchase" using Google Tag Manager (GTM), GA4, and a cookie that mimics GA4's session behaviour.
We’ll set a session start timestamp using a 1st-party cookie (please bear this in mind with your consent mode setup), calculate the time difference when a purchase occurs, and send that value to GA4 as a custom metric. Then we’ll create a calculated metric for the average time to purchase.
This approach mimics GA4's session behaviour as closely as possible. In GA4, a session times out after 30 minutes of inactivity by default. While GA4 manages this internally through its own cookies, we can't directly access those cookies via JavaScript. So instead, we create our own short-lived cookie to act in a similar way: it starts when the user lands on the site and refreshes with activity, expiring after 30 minutes of inactivity - just like GA4.
1. Get the Session ID from GAs cookie
Google Analytics drops cookies when users have given consent. By utilising this, it gives us the most accurate and robust way to know when a session starts as the “session_start” event is somewhat inexistent in the dataLater to utilise.
We can then use this to apply a timestamp and call it custom_session_start which lasts 30 minutes and refreshes with user activity, so that it mimics GA4’s default session timeout. If you have updated this in your property admin settings then you may want to change this to mirror it.
If you are a developer and/or more accustomed to the backend, this also logs in the console. I just used this to help me debug it initially.
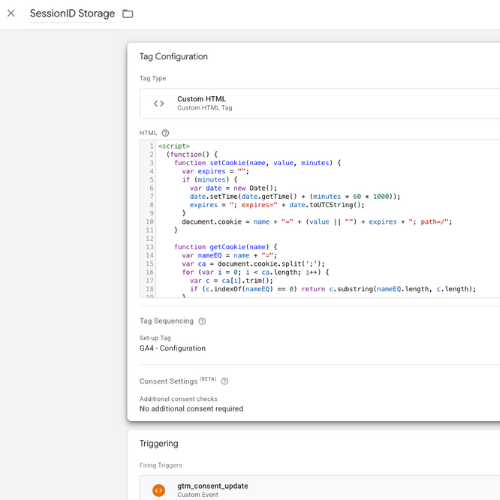
Create a Custom HTML tag in GTM with the following code:
(function() {
    function setCookie(name, value, minutes) {
      var expires = "";
      if (minutes) {
        var date = new Date();
        date.setTime(date.getTime() + (minutes * 60 * 1000));
        expires = "; expires=" + date.toUTCString();
      }
      document.cookie = name + "=" + (value || "") + expires + "; path=/";
    }

    function getCookie(name) {
      var nameEQ = name + "=";
      var ca = document.cookie.split(';');
      for (var i = 0; i < ca.length; i++) {
        var c = ca[i].trim();
        if (c.indexOf(nameEQ) == 0) return c.substring(nameEQ.length, c.length);
      }
      return null;
    }

    var existingTimestamp = getCookie('custom_session_start');
    var currentTimestamp = Date.now();

    if (!existingTimestamp) {
      // First visit or session expired – set new timestamp
      setCookie('custom_session_start', currentTimestamp, 30);
      console.log("Session start set for first time:", currentTimestamp);
    } else {
      // User is still active – refresh expiry
      setCookie('custom_session_start', existingTimestamp, 30);
      console.log("Session refreshed, keeping original timestamp:", existingTimestamp);
    }
  })();
</script>
Call this tag SessionID Storage
Ensure your GA4 Config tag fires before this so that analytics has had time to drop its cookies. Do this under Tag Sequencing and selecting your GA4 config tag as the set-up tag.
Fire this tag on All Pages and/or when consent has loaded depending on your content management platform.
2. Create GTM Variables
1. 1st-Party Cookie Variable:
Name: custom_session_start
Type: 1st Party Cookie
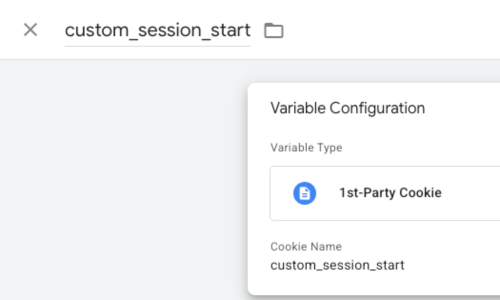
This captures the timestamp from the cookie we set in the previous step.
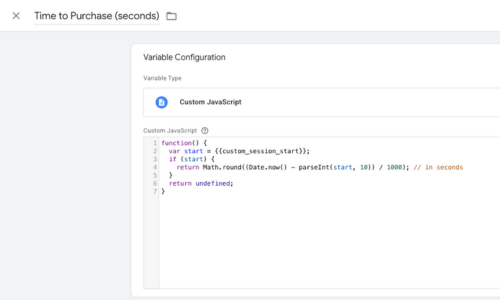
2. Custom JavaScript Variable (for calculating time to purchase):
Name: Time to Purchase (seconds)
Type: Custom JavaScript
function() {
  var start = {{custom_session_start}};
  if (start) {
    return Math.round((Date.now() - parseInt(start, 10)) / 1000); // in seconds
  }
  return undefined;
}
This utilises the session timestamp from the cookie, then creates another timestamp which we will use on the purchase event to calculate the total time to purchase in seconds.
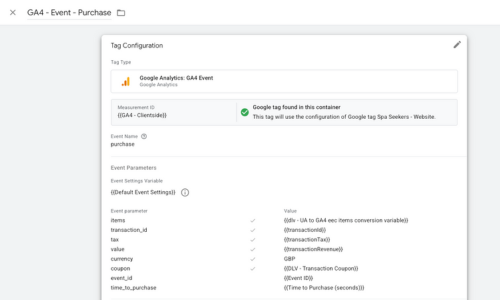
3. Update the Purchase Event Tag
In your GA4 purchase event tag:
Add a custom event parameter:
Name: time_to_purchase
Value: {{Time to Purchase (seconds)}}
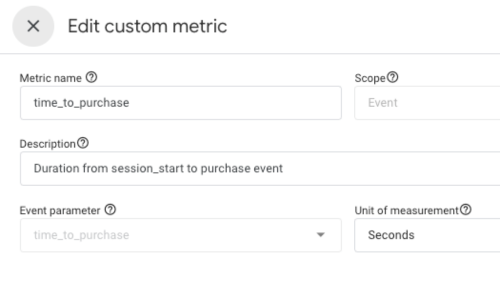
4. Register the Custom Metric in GA4
Go to Admin > Custom Definitions > Custom Metrics.
Click Create Custom Metric.
Use the following settings:
Name: time_to_purchase
Scope: Event
Unit: Time (Seconds)
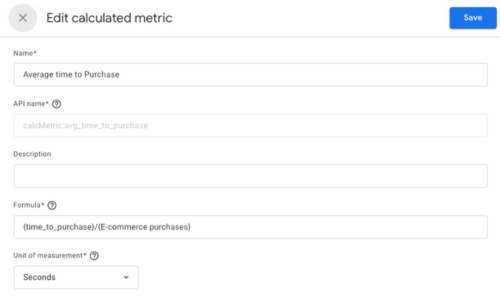
5. Create a Calculated Metric for Averages
Go to Admin > Custom Definitions > Calculated Metrics.
Click Create Calculated Metric.
Use:
Name: avg_time_to_purchase
Formula: {time_to_purchase}/{E-commerce Purchases}
Unit: Time (Seconds)
This gives you the average time it takes converting users to complete a purchase!
6. How to utilise the data
Once you’ve allowed some time for the data to collect, it’s time to see what you can do with it!
Add as a column to reports
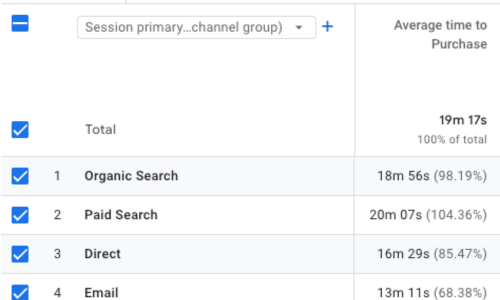
Open up a report, e.g. Traffic Acquisition and select the pencil icon in the top right (customise report), you must have admin permission to be able to do this. Select Metrics, then choose the new “Average time to Purchase” metric and decide where you want it to be placed on the table and Apply.
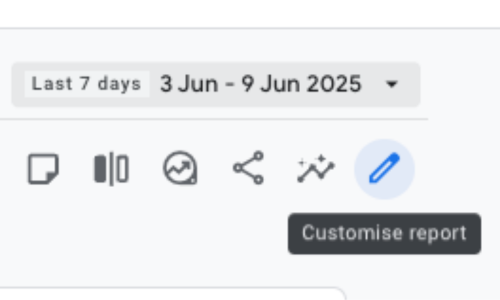
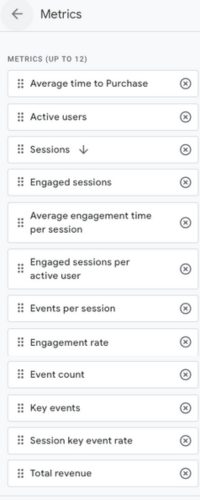
In this example of the Traffic Acquisition report, it gives you the average time to purchase by channel and GA4 automatically formats the total seconds into minutes and seconds for easy analysis. I have put it in the first slot just to hide financial data and used a short date range, but hopefully you get the gist.
Deeper insight with Explore
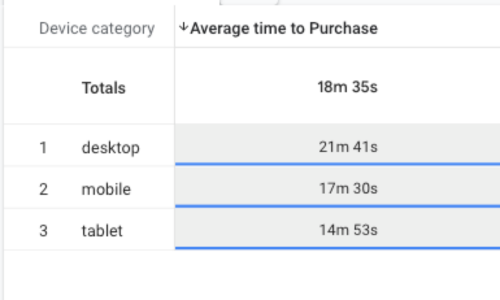
The world is your oyster with explorations, you can create a simple table such as device category to compare average time to purchase by device.
You can even use Demographics such as Age… hehe.

Or you can apply it to different segments, which is particularly useful when comparing A/B test variants. I have also used a short date range in these explorations, as it’s an average I suggest you have a longer date range to yield a more accurate result!
I have noticed that reports and explorations can be a bit slow at loading since adding this, so please bear that in mind.
Final Thoughts (and a Small Disclaimer!)
I’m not a developer - just someone who’s curious and determined to make GA4 more useful in the real world. This solution came together with a bit of creative thinking, plenty of testing, and some very tactical help from ChatGPT along the way!
So if you’re not a developer either, please know: this is 100% doable with a bit of patience and experimentation. And if something doesn’t work exactly as expected, that’s okay - treat it as a learning opportunity, tweak it, and test again.
I hope this guide gives you some inspiration to try more custom implementation with GTM and GA4 to really get the value out of the tool! 🙂
This post took me a considerable amount of time to implement, test and write. Please do not copy or republish without my permission, but you’re welcome to reference/link to it. Thank you!